I have finally got around to doing another post on the bus project. I have had a break of a couple of weeks due to illness. I developed a bad chest condition which has finally begun to ease after two courses of strong antibiotics. Anyway, I have been working on the bus as and when I've felt able to and this post will bring you up to date with progress so far. It's going to be a bit of a marathon, so here goes.
My last post showed the overhead cupboard frames and shelving almost completed. The next most important thing was the completion of the rear bed/lounge. I had intentions of using the bus but being sick put pay to that.
At this point I had to start panelling with the tongue and groove pine along the front of the seats and the backrests. The pic below shows the finished job. There is still some trim to put around the top of the backrests.
The pic below shows the 'bed board' in place. this goes between the seats and makes it into a bed. I used 12mm plywood for this and strengthened the front edge with a 20mm square piece of pine and screwed this into place. The edges of the plywood have also been trimmed with pine to make a snug fit.

The 'bed board' stores neatly against the back wall of the tall cupboard as the pic below shows. I had intentions of using smaller pieces of ply, for ease of storage, but a couple of clips will keep the board in the cupboard nicely. See pic below.

The next job was to 'face' all of the cupboards and the toilet/shower. The most difficult part about this job is cutting the planks to conform with the shape of the roof. To help, I cut a template from plywood and used this. This is the wall behind the shower and shows the tall cupboard.

The pic below is one of the front wall of the shower/toilet and how the panelling had to be cut to the shape of the roof.

The next pic is of the front overhead cupboard which had to be faced and cut to conform with the shape of the roof. This turned out OK I think. Cutting out the panelling for the cupboards was made so much easier with a little trimmer router that I bought for the job together with a trimmer bit with a bearing on the bottom. This meant that I did not have to be super critical with the lengths of the T&G pine and I could trim them to a neat finish after the glue had dried.

This is the dinette seat behind the driver's seat. The backrest panelling has been extended beyond the seat for the sake of neatness and also to provide a mounting point for the fire extinguisher which is a must. I was lucky and a good sized one was provided with the bus.

One of the issues I had to deal with was how to obscure the glass that sits over the shower/toilet. Even though the inside will have panelling all across, I was worried that it would look awful from outside. I had contemplated painting the glass, but my advice from the experts was that it is very difficult to get paint to stick to glass for long periods. Instead, I went down the path of a product by White Knight paints which comes in a small spray can for about $15. It is glass frosting and is easily applied and is designed to stick to glass. I applied the whole can in about 4 coats to the windows. The pics below show both the interior and exterior finished job. Lets hope it sticks like it's supposed to.

Interior View

The pic below shows the completed dinette seat on the left side of the bus. In front of the seat is a small cupboard which will house the power supply for my HF radio and also provide a handy shelf to rest an arm on or sit a drink on. The bottom part of this cupboard has been cut open to allow
access from behind the passenger's seat for storage of jumper cables or similar. I hope to change both the front seats to something more comfortable. The current left side seat is skinny and uncomfortable and will not tilt forward.
Hopefully I can find some suitable replacements from a car/4
WD etc.

This is a view from the rear of the bus looking forward. As you can see, I have put a top on the cupboard. I went down the path of 19mm melamine particle board for two reasons; The melamine provides some increased resistance to moisture and also prevents the underside of the panel being open to the air. The chemical stuff that they put in the particle board is not good to be
breathing 24/7. By the time
Laminex is stuck onto the top of this and a pine edging placed around it, the panel will be completely sealed again. I know that the L
aminex should not be placed onto the melamine, but I am assured that if I attack the surface with the belt sander, the glue will stick just fine.

The following two pics are self explanatory and give an overall impression of the stage that the conversion is at at the moment. I have priced all of the fittings including the appliances and will order those this week.


What's next? Well I think that its time to start getting serious with the 12 volt wiring, solar panels, fuses etc then start looking for an electrician who will run the 240 volt wiring for me. I have to have a 15 amp system installed together with an earth leakage detector. I am going to get a power point placed at the rear near the bed and one outside where the awning will go. You never know when you might need it.
There won't be much done now for at least another week. I'll try to keep the posts more regular from now on. Thanks for reading.

 The pics following show the back of the kitchen cupboard with after one coat of stain and one coat of the varnish. I have chosen to use Bondall Marine Varnish because of it's UV resistance. Although clear and very high gloss, this varnish contains an additive which prevents UV from yellowing the pine. Most varnishes, even external ones don't prevent UV damage.


 I used 15 amp 2 core automotive cable from Jaycar because it was both heavy enough and has insulation on the wire and a heavy plastic cover encasing both wires. With the lights, the simplest thing to do was to start from the battery, go up the wall to the underside of the overhead cupboards and run the wiring around all of the cupboards. Where I wanted a light, I put in a terminal block and ran two wires to go to the light. This means that all of the lights are in parallel, hopefully getting at least 12 volts right the way to the last light. (the outside light)
  This is the rangehood in its final position ready to be wired in and have the panelling either side of it. Not much stainless steel for $250.00 though. I decided to have the rangeood which flumes to the outside because there is nothing worse than cooking smells in a caravan/motorhome.
 The pic below is of one of the kitchen cupboards which I've decided to use as the mounting place for the power supply for the fridge and the battery charger. I didn't want to put these units in the battery box (under the right side dinette seat) mainly because of the possibility of overheating. Both of these units only work when the bus is plugged into the mains. The one on the left is the unit that came with the fridge and connects to the fridge and the battery. It works by sensing when 240 volts is present, and then automatically disconnecting the fridge from the battery. Of course when the mains are connected the 'smart' battery charger (on right) will also begin charging the battery. A power point will also go into this cupboard.
 For safety reasons, I have installed a 60amp dual circuit breaker (pic below) which all power from the battery will flow through. These units are designed for high power car audio, but will do the job nicely. These are available from Jaycar for $30.00. If there is a fault anywhere in the system this will disconnect the batteries from the circuit and minimise damage. Two 120 amp batteries in parallel provide enough energy to weld metal and could easily cause a fire. One of the circuit breakers is for all of the applicances. The other one will be for a dedicated output to my amateur radio which draws up to 23 Amps on transmit. Again this will provide a safety measure if there is a short in the system.

 This pic shows the right side of the bus and the install of the fibreglass gas box, the 240 volt inlet and the filler for the right side water tank. Peter used Sikaflex white sealant adhesive to make the gas box fit around the profile of the side of the bus as can be seen in the pic below. Of course there is a cover with a lock to go on yet.
 The pic below shows the left side of the bus and the other water filler. Ive decided to go with two fillers because although one would have done for both tanks, it's my intention to plumb each of the two tanks to the pump separately. This will allow me to know when each tank is empty and therefore how much water I have on board. Because of the sizes of the tanks available, I have only 2 x 60 litre tanks. Any extra will have to be carried in portable containers.


 Ive got somewhere to put the tools now. An early test for the strength of the shelving. seem to be holding up OK so far.
 This isthe shelving in one of the kitchen cupboards and my new nail gun. Never used these things before, but I am a convert. They are great. I've also got a smaller C1 bradder and stapler, both of which have been very useful so far. See you next time.
 This pic shows the cupboard over the cab. This will have side hinged doors also. It is a great spot for an LCD TV too. You can see it from everywhere in the bus except the toilet, but nothing a window wouldn't fix. OK looking out, not so good looking in! The 45 degree pieces on
  This is the completed framing for the shelf on the right side of the bus. This will be upholstered on the underside and like all the other cupboards and lined on the top with carpet tile to stop stuff moving around
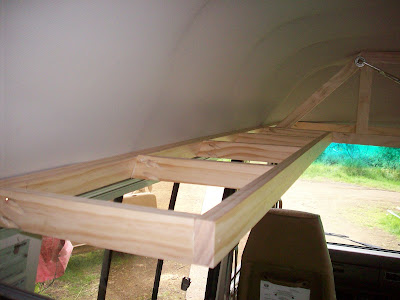


 This is the almost complete rear cupboard frames. This has to have a divider in the middle and some framing across the base of the cupboard. I would have done it today, but I ran out of timber. Anyway, so far so good. Now I have to tackle the cupboard over the cab and the shelving that will run from where the over bench cupboards end to the over cab cupboard. The over cab cupboard will house the LCD TV/Video and have storage behind. Thanks for reading, more tomorrow I hope.
 This is the framing around the bed/lounge that I mentioned yesterday. I have to leave these uninstalled until after the hotwater system and plumbing are in, but you get the idea. These will be fixed to the walls and clad in pine panel like the rest of the furniture.
 This is the start of the overhead cupboards. One end of this one is supported by the cupboard wall behind the shower/toilet and the other end supported by the rear cupboard. I had several trips between the saw and the bus today working out the angles to fix the cross members to the timber plate that is tek-screwed to the wall.

 The Dinette seat ready to install. The door opener is at the bottom of the pic.


 The fridge is in place and only now requires a little packing on one side (polystyrene wrapped in plastic) and a couple of pieces of trim on the front. I had to change the door so it would open from the left because otherwise you would have to lean over the top of the door while you are working in the kitchen. I could have left it the way it was which would only have been any good for getting out a stubby while you were in bed!