If you are interested, I am running a blog about the first big trip to the mainland at http://www.raysmainlandtrip.blogspot.com/
Have a look.
Ray
Thursday, June 17, 2010
I think It's Done
I think It's done. There is no way of knowing for sure, but for the best part the 9 month Odyssey is over. Today I am just 2 days from leaving for the big adventure on the mainland. I guess now is the time to go back over what I've learned over the last 9 months.
There's no doubt that I am much wiser now than I was when I started. I'm wiser in so many ways. The main things that I learned are;
- Planning is the most important thing - you can save so much time and money by taking time to plan exactly what you are going to do, but also how you're going to do it. Next time I do this, the whole layout will be planned well in advance. Everything will be measured out and planned properly so there are no nasty surprises and things to fix after they've already been done.
- Do all of the wiring, plumbing a gas work first - As I've found doing all of the wiring, plumbing and gas work first will save a packet in labour costs. The benefit of doing this stuff up front before the furniture goes in is huge. The amount of time I spent squeezing into tight places and trying to get pipes and wires through was just stupid. If I'd done all of the 12 volt wiring first for example, I would have saved a heap of time and heartache.
- Use plywood instead of frames - instead of using the framing system, I would use plywood sheets to make the furniture and then clad it with pine. This would make the construction, lining and finishing of the furniture so much easier. Using chipboard should be avoided because of the weight factor. The only problem with using plywood is that you need a good panel saw to make accurate cuts to size.
- Build furniture outside - As much as possible, the furniture would be much easier built outside the vehicle and moved inside and assembled. This adopts the modular concept and as far as possible should no only be constructed, but also finished prior to installation.
- Buy in bulk - I spent too much time and money buying materials bit by bit. Far better to plan and buy everything you need up front and from one supplier where a good discount can be negotiated. Motor home equipment is expensive so any discount you can get will be well worthwhile.
- Budget - I still don't know how much I've spent on the white monster, and what's more I am frightened to add it all up. I think that you need to work out what the main components cost and then double it and you will come somewhere to close to the mark. It must be said though, that whatever you do, it will be much cheaper than having someone else do the job for you.
- Research - look at as many layouts and designs as you can. The Internet is a wonderful thing you can get so many ideas from just taking time to look.
It's been a fantastic journey and has done me a power of good personally. Before I started this project I was not sailing too well, but it has helped me focus on what I really want in life and changed my life.
If you dream of doing what I've done, have a go for heaven's sake. The end result is really satisfying and just like me you will end up with a fantastic recreational vehicle that really will mean that you can Work to Live, not Live to work.
Its been great having everyone along for the journey. I hope that I've helped some people solve some problems and maybe inspired some of you to have a go at doing this for yourself.
I plan to run a blog of the upcoming trip if any of you are interested. I'll add the address to this blog once I've set it up. Cheers for now. Ray
Sunday, June 13, 2010
The Antenna Tuner is In and it Works!
What is all the fuss about an antenna tuner? Well when you play around with HF radio, having a means to quickly tune an antenna to a given frequency is very important. One of the things that I set about fitting out the bus was so that I could use is as a portable radio shack.
A few months ago when I went to Ross for an amateur radio weekend, and discovered the SGC-237 antenna tuner. This unit is designed to tune antennas of all kinds and has a very good reputation. I decided to take a chance given that if it works the way its supposed to, it would make life very easy when it came to carrying and erecting antennas for frequencies that usually require very long lengths of wire.
The specifications call for the usint (which is waterproof) to be mounted under a cover to keep the sun off it. I decided to fit the unit inside a metal box on the back of the bus, but having done this, had to get heavy coaxial cable and a 12 volt line from the box to the front of the bus to the small bench that I made to hold the radio.
The pic below shows the box mounted on the rear of the bus. You can see the cables coming out the bottom of the box. The white insulator on the top was made for me by David Wilson of ttssystems. David also sold me the SGC tuner and when I couldn't find the high voltage insulator I needed to get the antenna wire out of the box, made it for me. Thanks Dave.

The metal loop to the right of the box is where the 10 metre telescopic fibreglass squid pole slips into. The squid pole support 65 feet of antenna wire which the tuner makes resonant.
The pic below is a close-up of the antenna tuner in the box.


A few months ago when I went to Ross for an amateur radio weekend, and discovered the SGC-237 antenna tuner. This unit is designed to tune antennas of all kinds and has a very good reputation. I decided to take a chance given that if it works the way its supposed to, it would make life very easy when it came to carrying and erecting antennas for frequencies that usually require very long lengths of wire.
The specifications call for the usint (which is waterproof) to be mounted under a cover to keep the sun off it. I decided to fit the unit inside a metal box on the back of the bus, but having done this, had to get heavy coaxial cable and a 12 volt line from the box to the front of the bus to the small bench that I made to hold the radio.
The pic below shows the box mounted on the rear of the bus. You can see the cables coming out the bottom of the box. The white insulator on the top was made for me by David Wilson of ttssystems. David also sold me the SGC tuner and when I couldn't find the high voltage insulator I needed to get the antenna wire out of the box, made it for me. Thanks Dave.
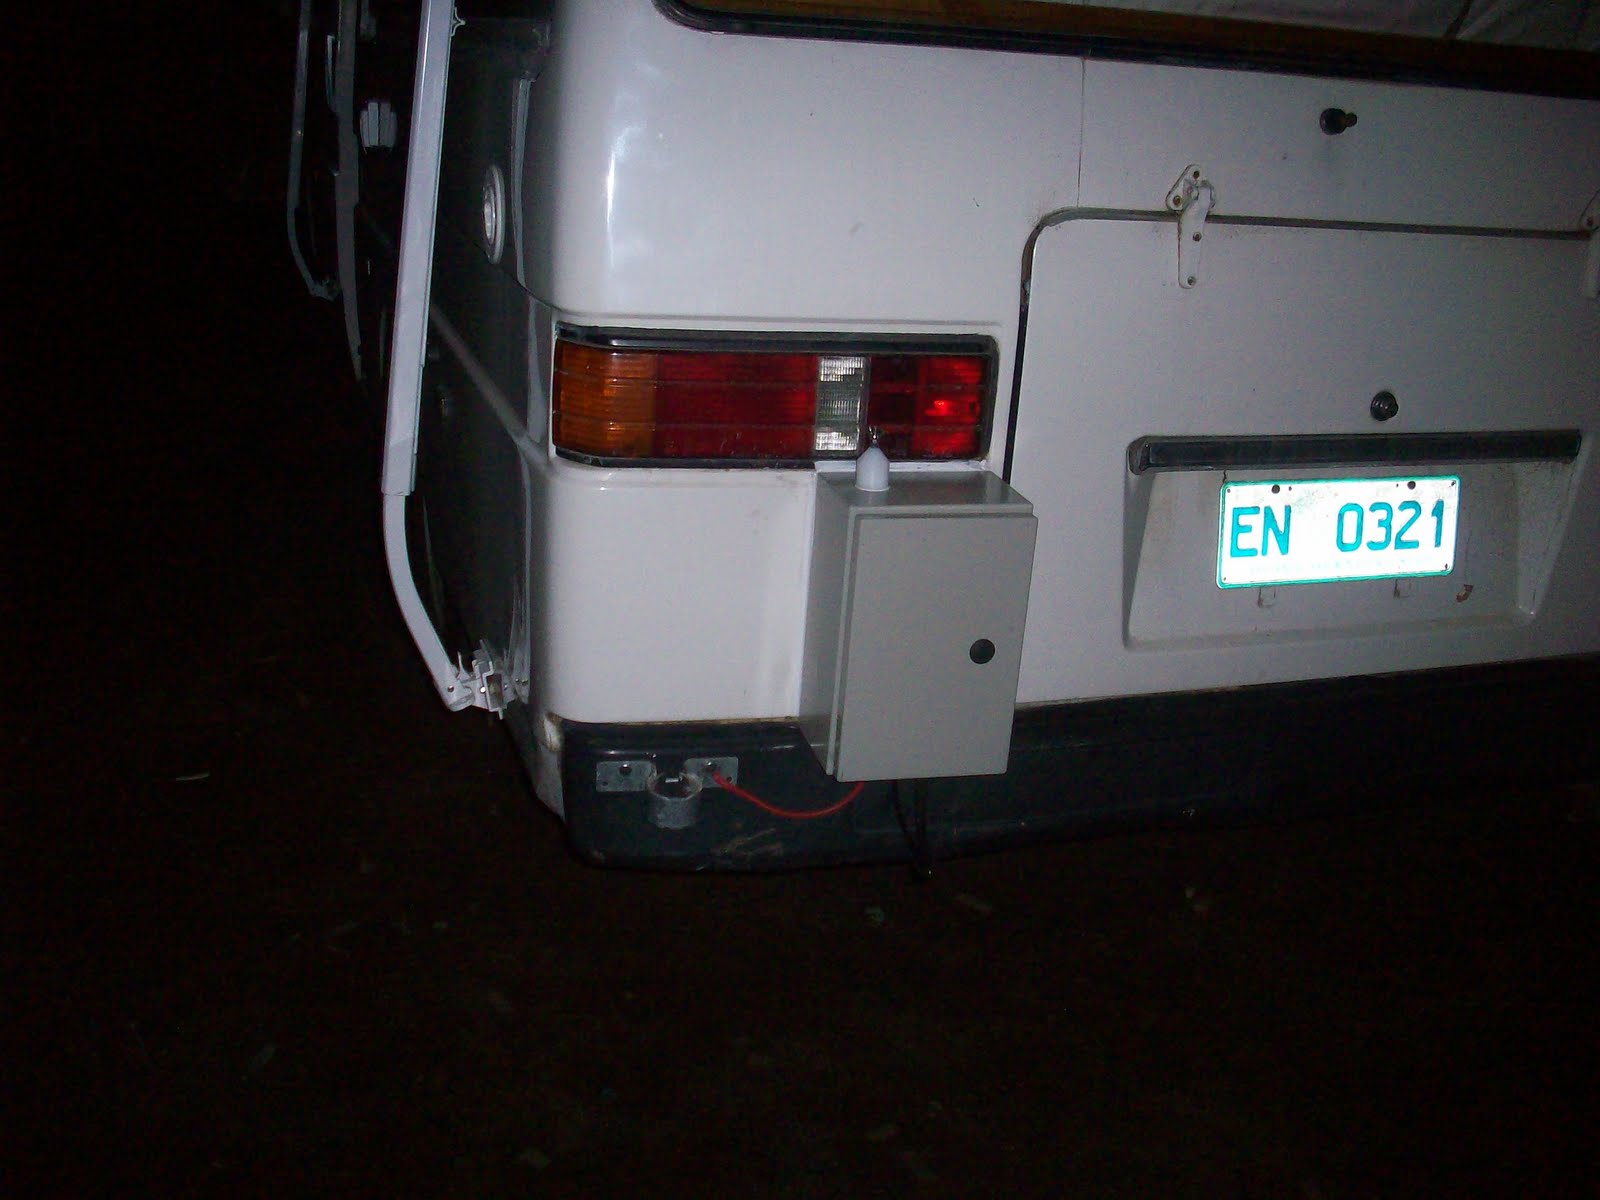
The metal loop to the right of the box is where the 10 metre telescopic fibreglass squid pole slips into. The squid pole support 65 feet of antenna wire which the tuner makes resonant.
The pic below is a close-up of the antenna tuner in the box.


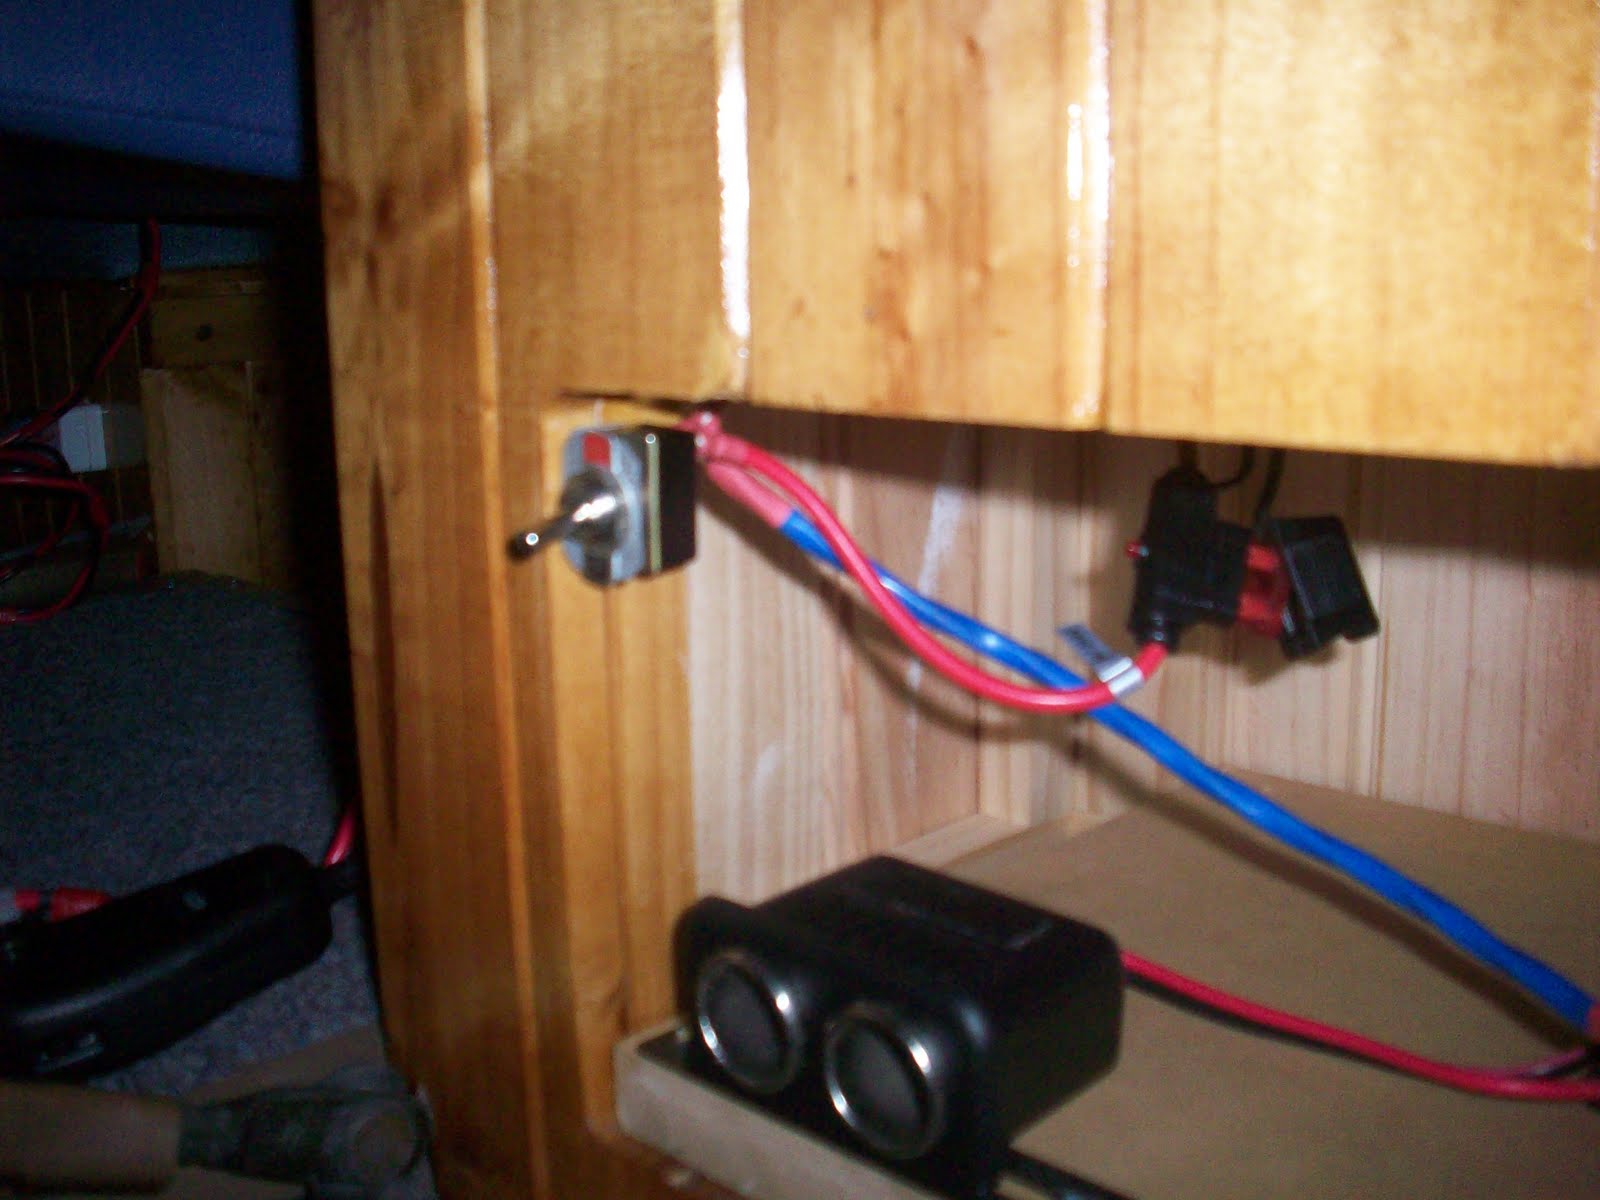
This unit has 12 volts to it from the front of the bus. The reason for this is that it needs to be switched off when not in use to save the battery. The running of the coax cable and the 12 volt cable was an 'under the bus' job, so I called upon one of the best 'under the bus' people I know, Lucy. she spent a couple of hours trying to avoid getting stuck again like she did before. Managed OK this time, but there was a fair bit of complaining.
The pic below shows the location of the switch. I ran the 12 volts from the panel that I made earlier un the cupboard that he radio sits on.
Earlier today, we put the squid pole up and gave the tuner a test run, On 40 metres a contact S9 to Queensland, then to the US Canada border on 20 metres, also S9. The antenna and the tuner work really well.
Only 5 days to go before I leave. Still lots of little jobs to do including the installation of the voltage sensetive relay to charge the house battery off the alternator. That's tomorrow, we'll see how I go.
Sunday, June 6, 2010
The Shower is Done
The shower is finally done. What a job. When I think about it, it was almost the first thing I built in the bus. It has definitely taken the most work. The steps were the framing, followed by the cladding, then the plywood lining. That was followed by the PVC lining, then the sealing, then lastly the fitting of the door. Anyway, its done and looking really good, even if I do say so myself. I will let the pics do the talking.
The pic below shows the acrylic sheet in the bottom of the shower.

I cut the PVC with a big pair of scissors. It is coated on both sides with a coarse paper to protect the surfaces. This makes it easy to mark out the outlines of the pieces and cut them to size. There was a lot of measuring and drawing which I transferred from a simple drawing I did in the bus. The drawing and cutting was done on the lounge room floor. Much easier to get on top of the sheet to work on it.
The PVC sheeting was stuck to the plywood with liquid nails. This adhesive sticks quite quickly, but allows enough time to move the sheet if needed. The next job was to seal the edges and joints. For this I used a product for Crown which is similar to Sikaflex, but claims to resist mould more. The sealer doubles as an adhesive and once it is cured helps hold all of the edges together. It is strong and adheres very well to the PVC and acrylic.

The pic below shows the waterproof LED light on the wall of the shower. This light was $50.00 from the RV Superstore in Fern tree Gully. It has 48 LED's and casts quite a bright light especially reflecting off the white walls.

The shower head and taps re-installed on the back wall of the shower.

The pic below shows the toilet installed. I have got to tie is down with some waterproof self adhesive hooks on the floor. The flush water is in the top and it makes it a little top heavy. I've put some anti slip matting under the toilet to prevent it from moving around.

The pic below shows the folding door installed. I bought this a few months ago at Bunnings. It is made from plastic and is waterproof. I had to cut it down and shorten it, but it now fits really well and looks good too. I decided to go this way rather than a hinged door just to save room. Even though it fits, I'm planning on fitting a shower curtain on the inside to stop any water from leaking out. I think it will work fine.


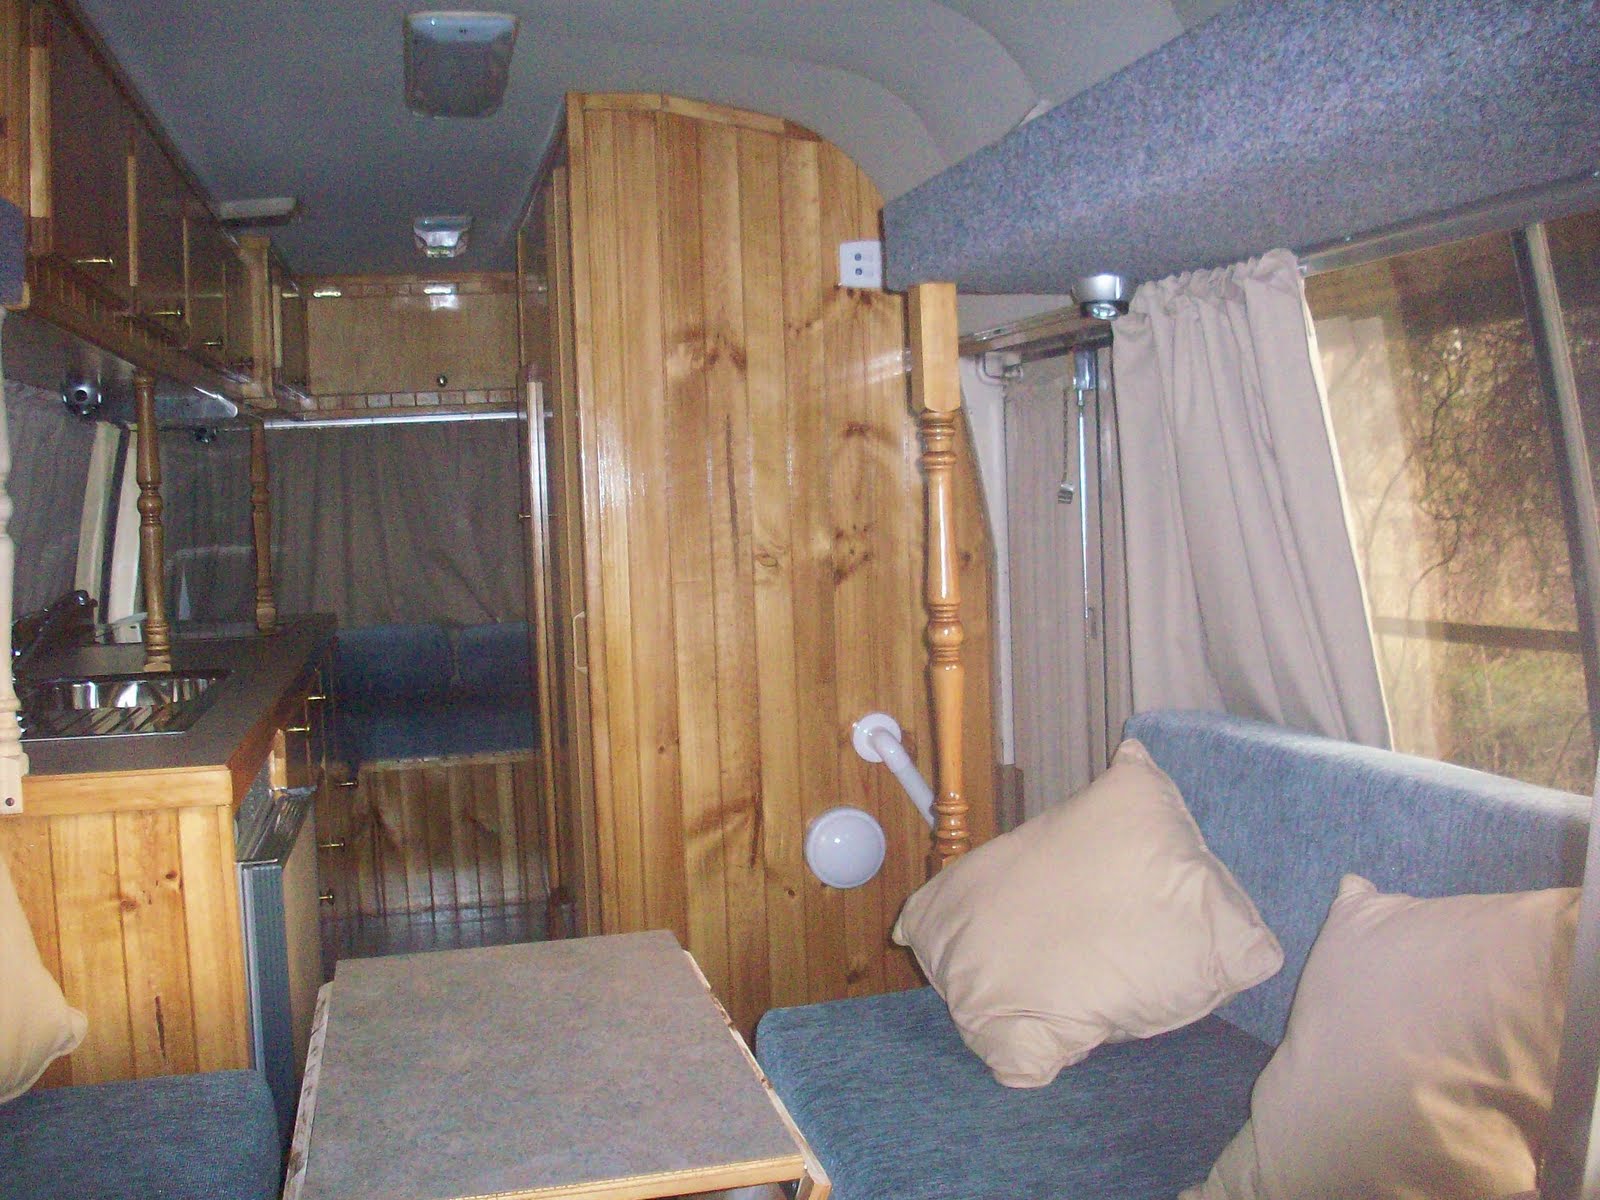
This last pic is an overall update of the interior taken today from the cab.

The Seats Are In
I know I'm getting to the final stages now that the refinished seats are back in. The whole seating thing has been a worry since I started. I had planned to buy two replacement seats and fit them into the bus. The more I looked into it the harder I saw that it was going to be. Any replacement seats were going to require a fair amount of metal fabrication to make them fit.
The two main issues were that the steering wheel in these busses it quite close to the seat (made for small drivers) and the other is that the passenger's seat has to be narrow enough for the engine box to still lift up. There is a small flap next to the engine box on the passener's side which has to lift up to allow access to the radiator water reservior. If any replacement seat was too wide it would'nt allow this to happen. It would mean building the pasenger seat across the top of the engine box cover.
So, the decision was to make do with the original seats, but to have them recovered. I took them to a busniess in Moonah called Supertrim. A guy named Tony looked at them and reassured me that he had done seats from a Mazda T3500 before and he had some ideas on how to improve them.
There were two problems; the driver's seat was flat and had no shape on the part where your bum goes. The foam was flat and not very confortable. The problem with the passenger's seat was that it was very narrow on the back, had no lumbar support and the base had no shape in it.
After refinishing, not only do the seats look better, they are also much more confortable. Tony has built up the seats, improved the width of the passenger's seat, put some lumbar support in, and generally made the seats look much more alike than they did. The pics below show the story.

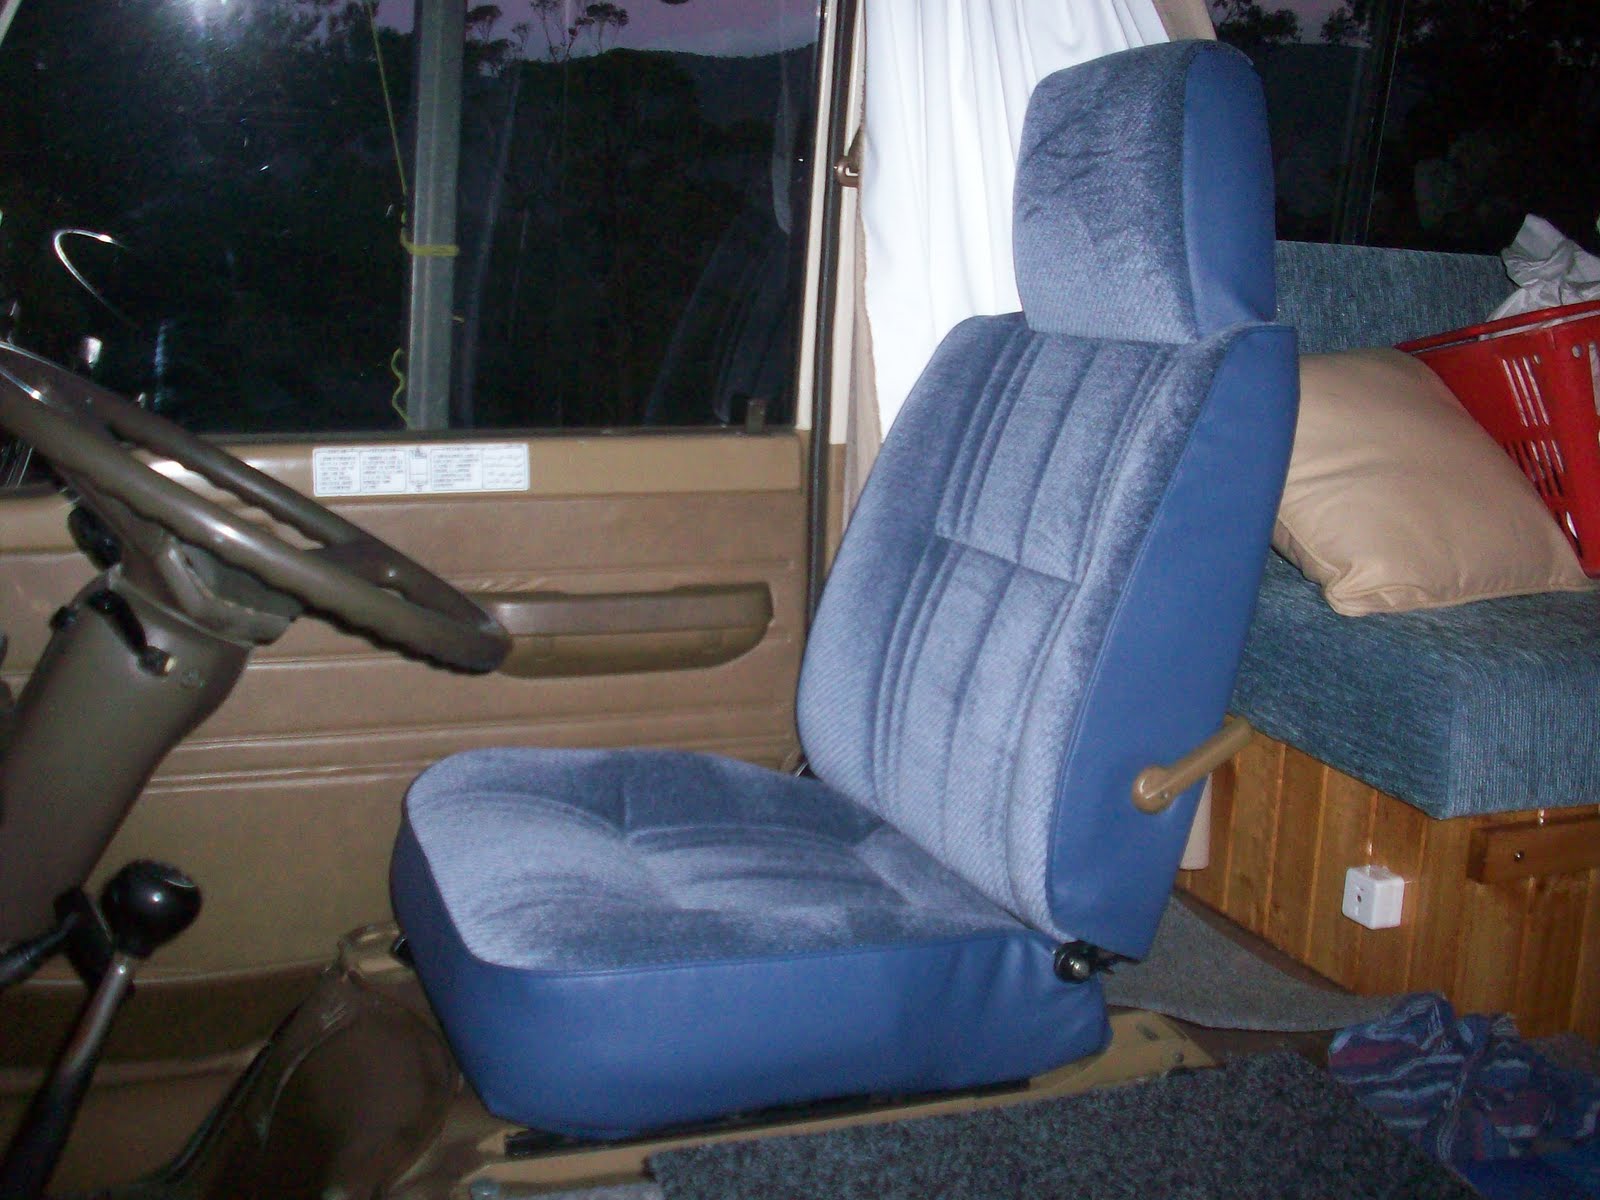

They've turned out OK I think, and I jagged the colour to match the other upholstery too. I had the sides and backs of the seats done in vynil to save money and to make them more hard wearing too. The frames of the seats and the brown of the cab generally looks a bit out of place now, but I can live with it.
Yesterday I spent all day on the shower. It should be finished today, so I'll see if I can post some pics of the finished job tonight.
Engine Box Cover
When I began building the furniture behind the engine box, I didn't take into account the fact that the hinges on the box cover made it move backwards when it was opened. This meant that after the cover was opened several times, the hinges bent in the wrong place and eventually broke. It was too late to even think about changing the furniture so I had to come up with another way of hinging the cover.
The answer was these rubber engine cover catches which I found at Repco for $12.00 each. The box opens and hinges OK, but isn't ideal because the box wants to move backwards when its propped up, but I have a plan to fix it by putting an aluminium plate behind the cover so that it rests against it when open.

Monday, May 31, 2010
Gas Installed, Radios Fitted, Table Fixed
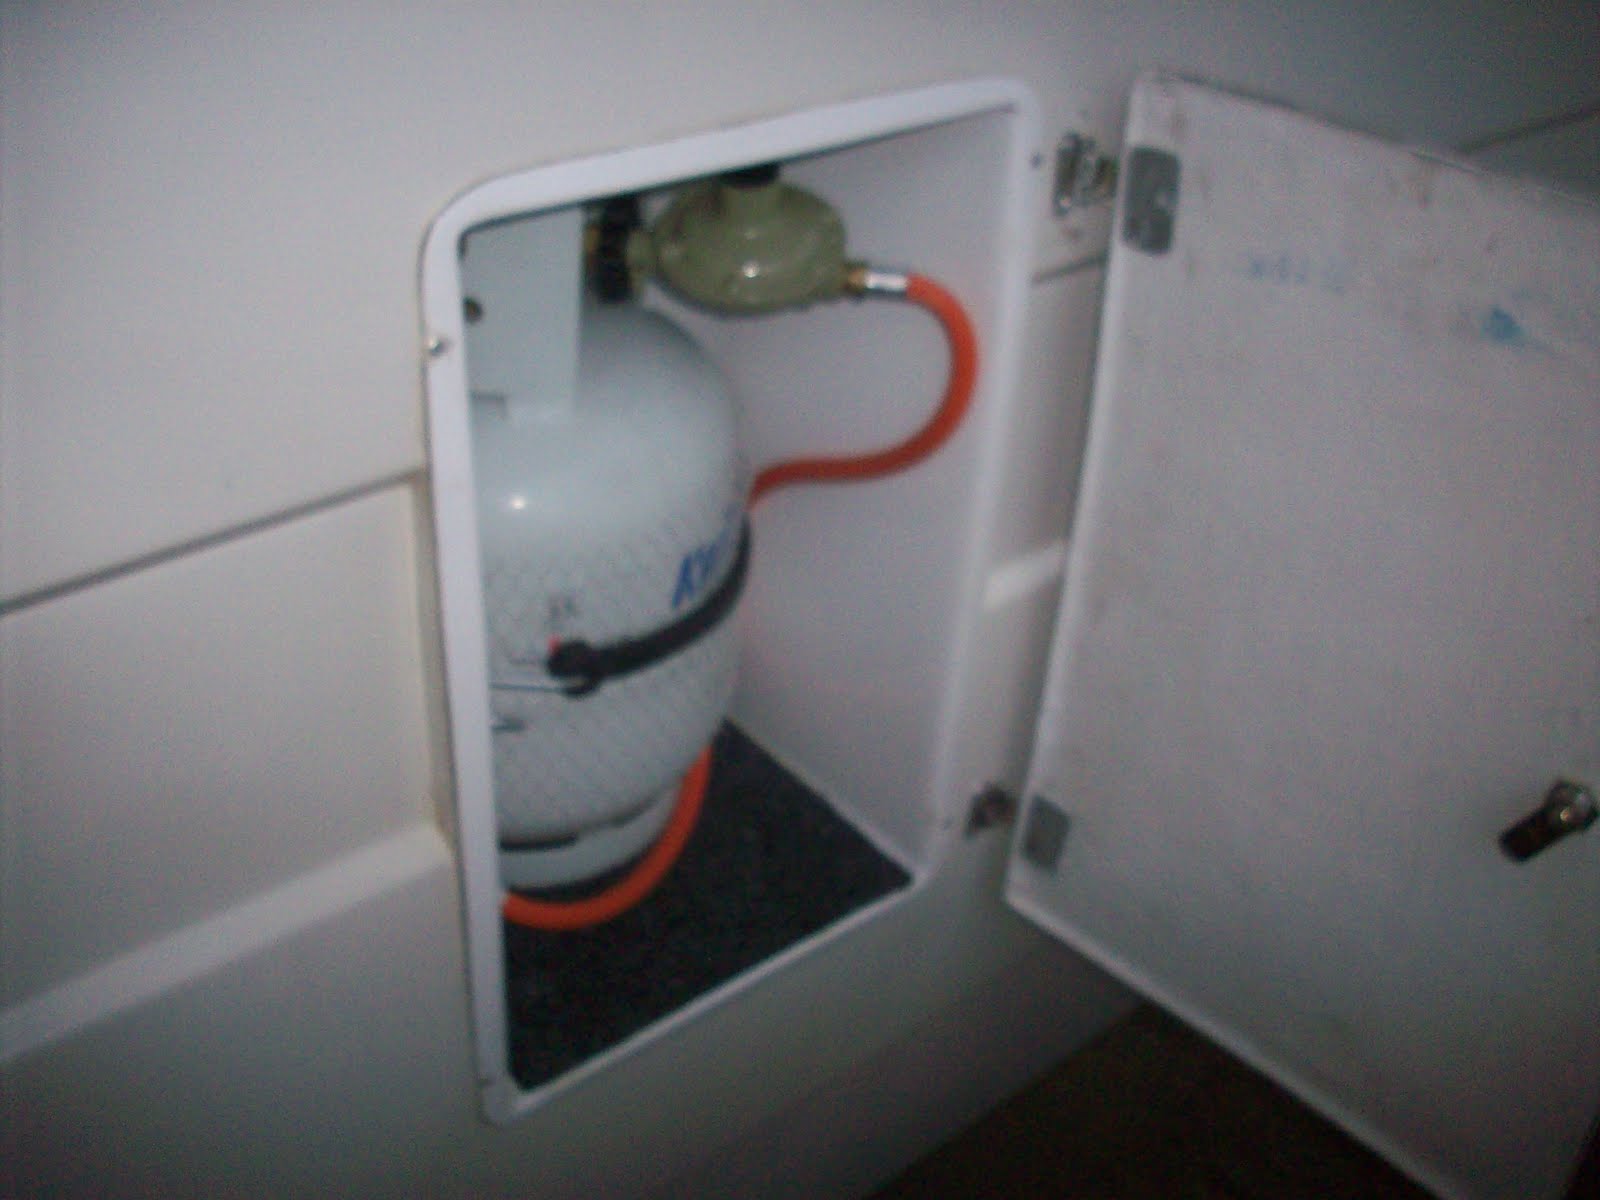
Back after a break and now with only two weekends left before the big trip to the mainland. One of the major things that had to be done was the gas fitting. The gas box was installed several months ago and I've been looking for someone to do the gas fitting and issue the safety certificate. All done now though. Not cheap however, $700.00 to install the regulator, and pipes to each of the cooktop and the hot water system. To say I was shocked at the price is an understatement. Anyway it had to be done and I guess that's what gas fitters charge these days.


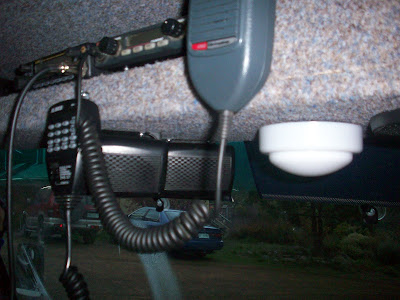
Being a Ham Radio nut, it was essential that I had not only the UHF CB installed, but also the 2 metre/70 centimetre transceriver. The radios were always intemded to be installed on the shelf over the cab, but the issue was always where the antennas would be mounted. The answer was to use gutter mounts. I found the mounts at http://www.andrewscom.com.au/ for $19.00 each.
Before I could install the VHF/UHF rig, I needed to run 15amp power cables from the battery of the bus. To do this I installed 2 heavy cables from the battery to a distribution board under the small cupboard behind the passenger's seat. I also added a double cigarette lighter socket for things likr phone chargers, TV etc. ($12.00 from www.jaycar.com.au )
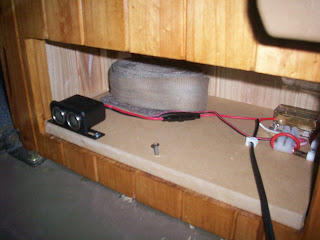


The pic below is of the gas box door which I installed last weekend. I had a few issues with making it fit and had to cut the door down with the angle grinder. The sticker on the box cover was $9.80, what a rip off.

Being a Ham Radio nut, it was essential that I had not only the UHF CB installed, but also the 2 metre/70 centimetre transceriver. The radios were always intemded to be installed on the shelf over the cab, but the issue was always where the antennas would be mounted. The answer was to use gutter mounts. I found the mounts at http://www.andrewscom.com.au/ for $19.00 each.
Before I could install the VHF/UHF rig, I needed to run 15amp power cables from the battery of the bus. To do this I installed 2 heavy cables from the battery to a distribution board under the small cupboard behind the passenger's seat. I also added a double cigarette lighter socket for things likr phone chargers, TV etc. ($12.00 from www.jaycar.com.au )

The following pics show the radios installed on the shelf and the antenna mounts on the front of the motorhome.
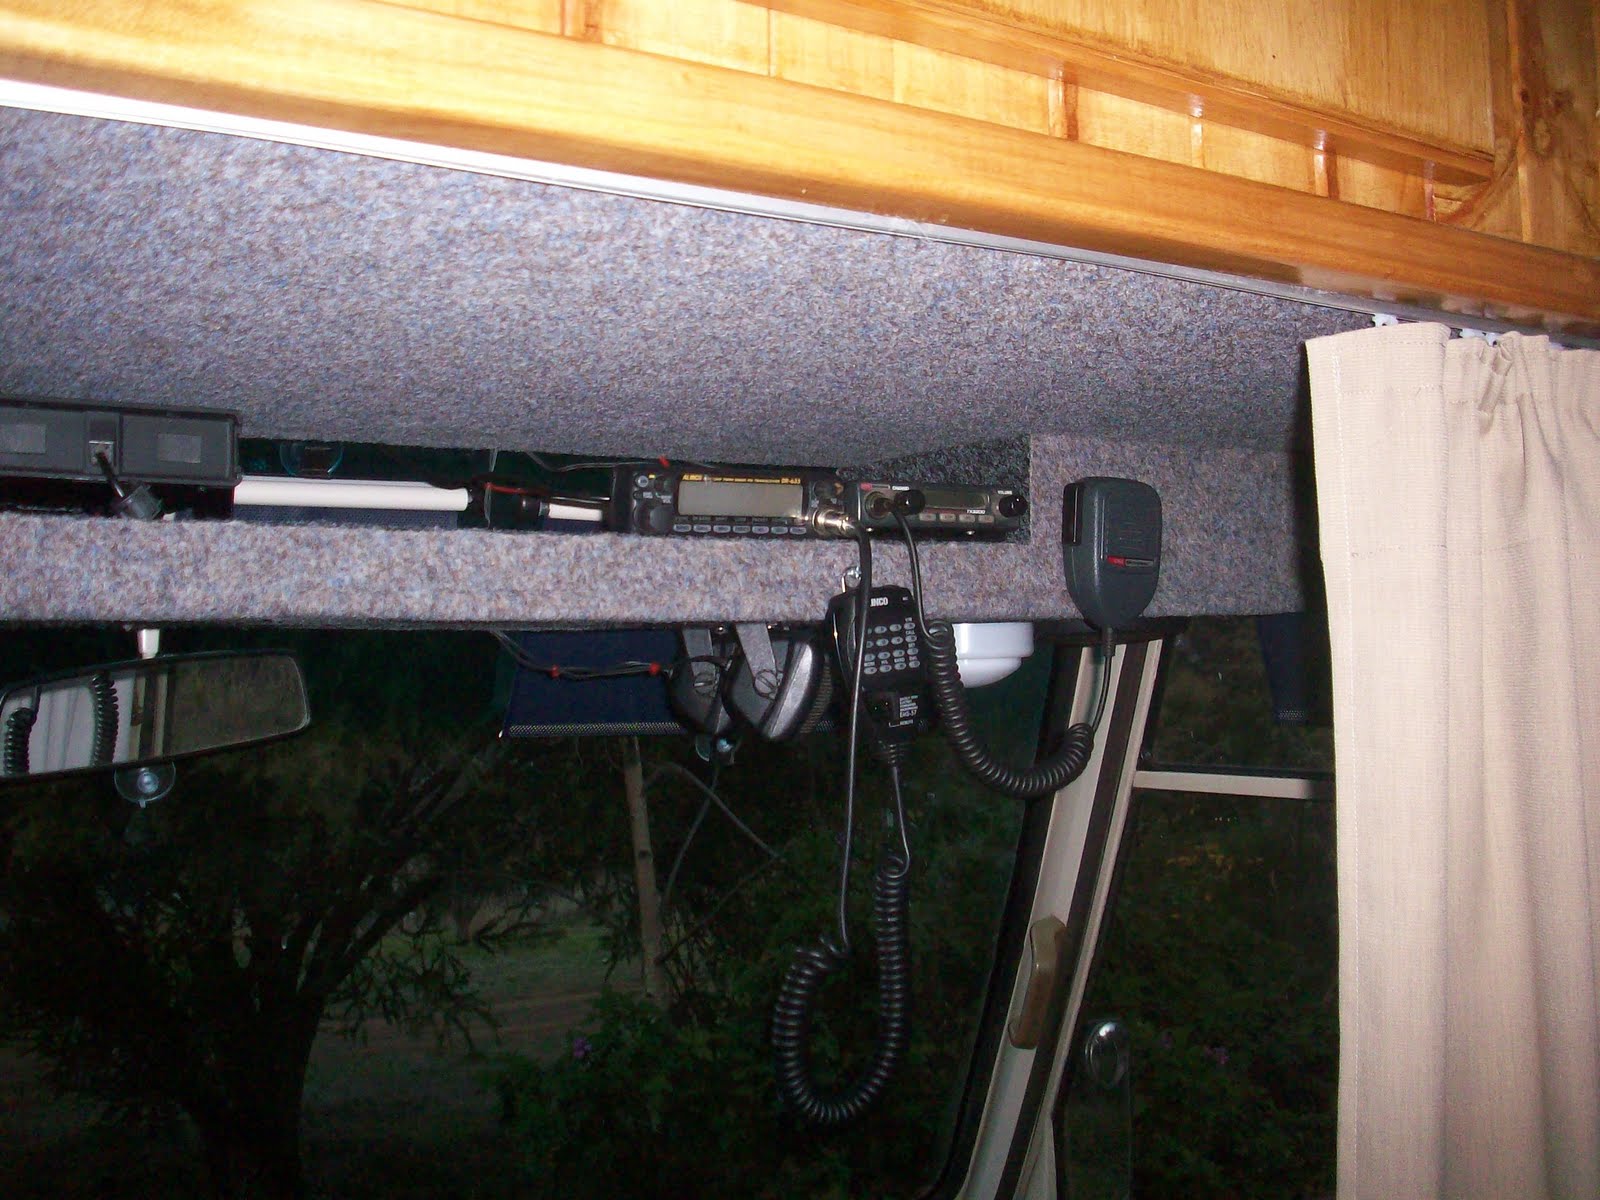

The pic below shows the UHF CB antenna on the gutter mount.

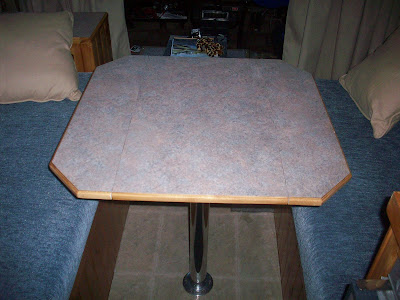
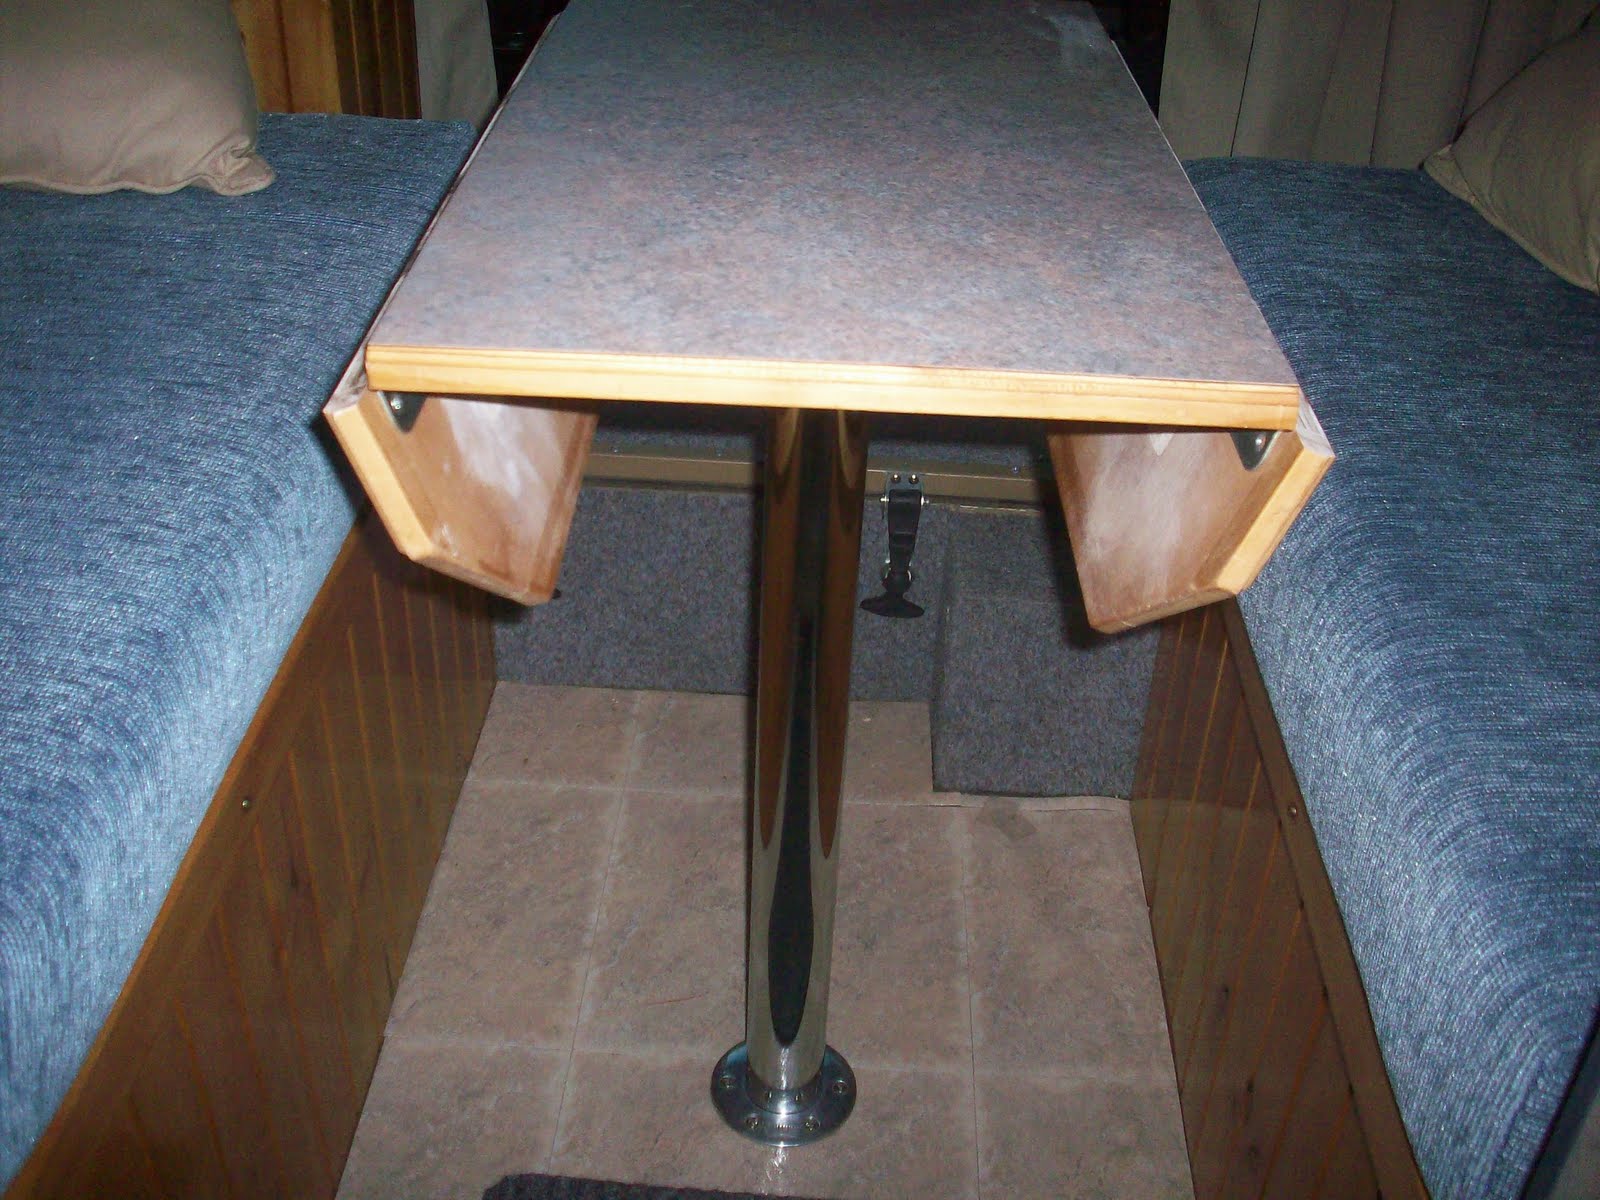
The Table
My original plans for the table didn't work out the way I's hoped. Put simply the table was too low and the drop down wings on it were way too long. It was impossible to sit at the table comfortably, so I had to shorten the wings. The pics below show the 'new' modified table with the wings down and raised.

Now I have to finish lining the shower, and by the way, the seats are at the motor trimmers being completely overhauled, new padding, reshaping and recovering. I've been promised big things, we'll see later in the week.
Subscribe to:
Posts (Atom)