Welcome

Thanks for visiting my Blog. Whether your visit is to check up on my progress, or maybe compare what I'm doing with a similar project you'r undertaking, welcome. Have a look around and leave comments if you would like to.

Sunday, February 14, 2010

Lining The Shower/Toilet

I started lining the shower/toilet today.  I began with the inside wall then did the back wall so I could locate the shower taps.  On the back wall I have used the ply off cuts from making the cupboards.  This stuff would have just been wasted, and it will all be covered in PVC and sealed.  I glued and nailed all of the pieces onto framing, so once the PVC is stuck on,  it will be solid and very light.


I can't do the outside wall until after the electrical outlet on the outside of the motorhome has been connected, but I can cut everything to size ready to fit.  The shower head is a special design to limit water usage and of course is hand held for washing those difficult to get to spots!

I have set myself a target date of 14 March to have the whole thing finished so the race is on.  Next will definately be more varnishing.  None of the doors have been done at all yet, then the whole lot have to have a second coat.

I have to take the unit into Hobart on Tuesday morning to get a quote on the fitting of a security door.  Looks like its going to cost about $600 though.  They have to build a frame on the outside before the door can be made and fitted.  I also have to order the flyscreens.  These are special flexible screens that fit with Velcro. They are made locally too.  More on those later.

Cupboard Catches

The cupboard catches are now all in place.  These small nylon catches were $2.00 from Award RV Superstore.  They are so much cheaper than the usual catches and they hold the doors closed very tightly.  We will see how they go once the vehicle is moving and the cupboards are stocked.  The overhead cupboards will only ever contain light food and  gear,  no tins etc so the catches should resist this stuff falling against them.

I had to mount the catches up on small blocks of plywood to make them work as they are supposed to.  There are two versions of the catch, this one and the one below which is designed for vertical fitting.


The small cupboard in the kitchen in front of the sink in the pic below is to store sponges, the plug etc from the sink.  I intend on building a plywood box behind it andlining it with the plastic cutofs from the shower lining. This has to have another catch fitted to to the other side when the rest arrive.


The next post will look at the start of the shower/toilet lining.

The Plumbing

I was somewhat worried about how I was going to do this part of the conversion,  but as its turned out, I was worried about nothing.  The secret of it being so easy, like most things is to have the right gear.  Peter showed me system which consists of 12mm blue and red tubing and a series of connectors into which the tubing simply pushes and seals.  You can removed the tubing by pressing the back of the connector and make any changes you want.  A bit like a Lego system.


This the tubing and the connectors as delivered.  On the top of the box is a basic filter which removes grit or other foreign matter from the water before it hits the pump.


The above pic shows the connection on the right side tank.  The green bizzo is a tap which cuts the output from this tank.  I have fillers for each tank and now it is possible to take water from either or both tanks simply with the turn of a tap.  The taps are Pope brand irrigation taps from Bunnings. $3.00 each.  You can also see the filter which both tanks outlets go though.  The pump is directly above the right side tank.

The pic above gives a good idea of how the tubing and the connectors go together.  This is behind the hot water system.  The inlet and outlet of the hotwater system is through 15mm brass connectors which I have sealed with teflon thread sealing tape.  As you can see the tubing is flapping around at the moment.  I have bought some 13mm poly saddles from Bunnings to tie the pipes all down to the floor,  but until I install the indoor/outdoor carpet in the bottom of the storage they will have to stay that way.


This pic shows the pressure pump fixed to the floor behind the hotwater system.  The red clips on the connectors go on after the tubing is installed to prevent the backs of the connectors being pressed in and the pipes being removed.  I will have to pressure test the whole lot as soon as the battery is installed and running.


This pic shows the pipes running into the back of the shower taps.  These connectors are inside the long cupboard behind the shower/toilet.  I didn't really know whether to have the water go into the shower at this point or from the side.  If the pipes came in from the side, once the walls of the shower were up,  there is no way that I could get in to fix leaks or other problems.  This way even though the pipes are visible inside the cupboard,  when they are fixed against the wall they shouldn't be a problem, and they are accessible.


This pic shows the mixer tap over the kitchen sink in  position.  This tap unlike some household taps is fixed in position.  The handle on the top turns to vary the temperature of the water,  but the base is fixed.  I think this is good because it is less likely to leak.  The tap is located here because it removes it from the cupboard where I want a power point installed (safer) and there is plenty of room under it to get a pot or kettle under it.  Look OK I think.

Water Tanks Fitted

This whole process has taken awhile to get done.  When Lucy came over to help we did some measuring and I decided how the tanks were going to be fitted,  but of course has happened so often during this project,  the plan changed.

A few weeks ago I took the vehicle down to Woodbridge where I was assisted by Gruesome who very ably fabricated four brackets from 5mm x 40mm flat bar.  The brackets  simply ad a bolt welded on one end and a right angle pice on the top with a hole drilled in them.  The brackets were then bolted up throught the floor at the front and onto the fear crossmember at the rear.

When I left Woodbridge the brackets were all made and fitted.  All that I had to do was make 4 supports out of light galvanised angle to bolt onto the vertical brackets.

The tanks have turned out to be a tight fit and there was definately no way I was going to get any biger ones in the space that I had behind the back wheels.  This means that the capacity of fresh water on board will be 120 litres plus the 20 litres of the hot water system making a total of 140 litres.

Because the tanks are a tight fit,  I decided to use contact cement to stick 12mm foam to the sides of the tanks and onto the supports.  This has had the effect of not only preventing the tanks rubbing on the steel around them,  but also to keep them properly in place if the happen to be empty while travelling.  The following pics show the foam used and the tanks in place.

This foam is used for putting in between section of concrete to allow for expansion.  In front of the the foam is one of the galvanised angle pieces that run along the lengths of the tanks.


This pic gives a good idea of how the tanks are mounted.  You can see the Gruesome fabricated  brackets and the galvansied angle.  The foam is stuck to the brackets and at all points that contact metal surfaces to stop rubbing.


This one is a view of the tank on the right side of the vehicle.  I have had to lower the exhaust bracket to allow enough room for the tank and the support.  I will have to have the tail pipe straighted and moved over towards the centre of the vehicle later.


You can see that there is not a huge amount of clearance between the tank and the spare wheel,  but enough that it will not cause any issues. In the next post I'll cover the plumbing.

The Outside Light

Hi again.  I have been a bit slack with the posts,  but the upside is there has been quite a bit done on the motorhome conversion since the last post.  I will post a few updates today to bring you all up to date.

I ordered the outside light though Peter from the Camec catalogue without finding out how much it was first.  This is a lesson well learned. Don't do it.  The light consists of two pieces of UV treated moulded plastic with 70 separate LED's and for this the retail price was $275.00.  Peter discounted this for me quite a bit,  but it is just stupid for a piece of plastic.

Anyway on the positive side,  it is made in Italy (big deal) and instead of just one function,  it has 35 LEDS on each of two circuits so you can alter the brightness and the power usage of the light to save the battery.  It also has a single 12 volt LED which is wired separately.  This means that it is possible to have just the single LED on as a night light.  Of course this uses almost nothing from the battery.

Here it is.  The $275.00 wonderlight.  It would not fit up under the awning, so I thought that this was the next best spot for it.  The window is the one over the shower/toilet and will never be opened, so I fixed the light to the glass with a combination of strong double sided tape and Sikaflex.  It will never move.  The wires were then covered in double walled heatshrink tube and run through the gap between the two pices of glass.  This has worked out well, no extra holes in the body and the light which will come from the light when the awning is out will reflect off the awning underside and the glass (which I have lately made the decision to paint on the inside with white acrylic.  The frosting should make a good foundation for the paint.  I hope so anyway.


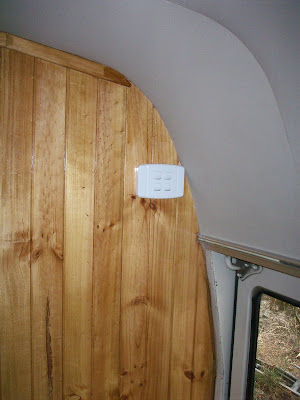
This pic shows the switch which is wired up to switch the 3 functions of the outside light and the waterproof 48 LED light in the shower/toilet.   I put it next to the door so it can get accessed easily.  Next post is the fitting of the tanks. 

Sunday, February 7, 2010

Venting The Rangehood

I have kept busy doing all of those 'little' jobs that get put off until another day.  One of those things was the fluming of the rangehood.  I have been putting it off because I though it needed another hole cut in the roof.  Peter tells me that he has installed a small round vent for this purpose on a Mazda before and it was a real pain.  He said that there is a double metal skin on the side of the roof and it is really difficult to cut through.  Having checked this out its true.  I was left with a rangehood that was virtually useless, at least I thought so.  Towards the rear of the vehicle on both sides and now inside the overhead cupboards are two vents which a meant to let air out of the vehicle when travelling.  I removed the vent cover which is about 500mm from the rangehood and found that it is just perfect for the vent.


Next I had to build a cowl over the vent hole to feed the ducting from the rangehood into.  The pics below show how I made the cowl out of plywood.  I put a baffle into it as well do direct the exhaust out more effectively.  I also used some of the sealing tape that came with the sink to seal it and stop it from leaking. The pic below is of the finished job. The cowl is 200mm x 50mm (inside).  Note the small metal angles to attach it over the vent hole.  I bought 50 of these from Bunnings in a pack,  they have been very useful for many jobs including fixing the furniture to the floor


The next pic shows the cowl in place over the vent with the ducting running into it.  I made the cowl just big enough to fit the tube and I will seal it in with some foam and duct tape so it can be removed for cleaning if need be.

The next pic shows the baffle and how it directs the exhaust outside through the vent.  I hope so anyway.  Once the batteries are in I'll test it.  The whole thing needs to be painted too.


The vent on the other side is perfectly placed to vent the shower/toilet ouside too.  I will have to make a cowl that I can fit a 12 volt fan into.  I ran the wiring today for that too.

Tomorrow,  I'll do a post on the new external LED light which I've wired in and also the tanks are definately being fitted.  Thats a complete post on its own.


Hot Water System & Roof Vent

Hello again.  Its been a couple of weeks since my last post  It's not that I haven't done anything,  its just that the jobs now are either largely behind the scenes or small and fiddly and really not worth doing a post just for that particular bit of progress.

On Friday,  the very long awaited Suburban gas hot water system finally arrived and was installed.  Peter from Tas Mobile Caravan Service delivered it and cut the hole in the side of the vehicle.  He first marked out the size of the hole, then went all around it with masking tape and cut out the hole with a 4 inch angle grinder and a very fine cutting disk.  It all went very well and was installed and sealed with a white Bostick sealer.  the pic below shows the finished unit installed on the right side rear of the vehicle.  I was surprised that the unit ($750.00) did not come with a door.  That was another $150.00.  The unit is useless without the door,  but they make you buy it separate.  No mention of that little extra surprise in the Camac catalogue.  Just when I thought that there was no more to pay.  Mmmm, motorhomes = expensive.


The next pic shows the unit with the door open.  It drops down from the top to access the unit and is completely sealed from the interior.  The gas connects outside too to avoid the liklihood of gas leaking into the vehicle.


The next pic is of the unit as it appears underneath the rear seat.  it is screwed through from the frame on the outside and just sits on the floor inside.  There are two 2 x 2 wooden supports on either side to stop the unit moving around on the floor when full of water. The unit holds about 20 litres of hot water. The brown box mounted onto the timber frame is electronic control circuitry,  the orange cable is the igniter.


The unit is connected to the 12 volt system and lights automatically. The pic below shows the switch which I have located on the front of one of the rear seats. The other wire is for the switch for the water pump.


The Roof Vent

When I first planned this conversion I wanted 3 roof vents,  that was reduced to 2, and now that I've come to actually install them,  I'm down to one over the dinette.  The reason is because I used too much of the roof space with the overhead cupboards.  There is room on the roof lining opposite the vent,  but I don't know if there's any point having two next to each other.  I really wanted one down the back of the vehicle,  but it doesn't look like it will happen.  The pic below show the vent installed and open.  I had to make up a wooden frame to support the roof lining otherwise it would have pulled the roof lining right up to the metal and looked stupid.

The vent is well sealed on the outside and can be left open a little when travelling.  My worry is that I'll leave it up and drive out of the carport.  I guess I'll only do it once.  The next pic shows the vent as it appears on the interior.  It has flyscreen on it to keep the bugs out.


The next post will be a summary some other little jobs that I've done in the last few weeks with some useful ideas on venting the rangehood and the shower.